
Modern grocery stores and food co-ops are testaments to humanity’s dominance of Planet Earth. Regardless of your location or the time of year, you can likely find dozens or hundreds of types of fresh produce at the nearest big store.
But our incredible food system hasn’t existed forever. Before the early 20th century, when modern refrigeration and efficient transportation systems began to make out-of-season food cheap and plentiful, it was exceedingly difficult or impossible to get out-of-season produce and other foods, and only the very wealthy could afford what little supply there was.
How did people back then enjoy produce months after the harvest? How did they make their limited, often intermittent supply of animal protein last through lean periods? The answer is through various preservation methods.
Canning is one such preservation method. It’s still ubiquitous today: Preserved fish, fruit jam and preserves, and canned vegetables are just a few of its many manifestations. Canning is also relatively easy (and even fun) to do in your home kitchen. Depending on what you’re canning and the scale of your operation, it’s often cheaper to can something at home than to buy it in the store – though canning is invariably time-consuming, which may change your calculus.
What Is Canning?
Definition and Origins
Canning is the process of preserving food in sterile, airtight containers without the use of artificial preservatives. It typically involves heating the containers to at least the boiling point of water, adding fresh or processed food, and heating them again to sterilize the contents. For some popular canned items, such as fresh pickles that wilt when exposed to heat, the second round of heating isn’t required and may actually be undesirable.
When properly prepared, tightly sealed, and stored in a cool, dry place, unopened canned food remains safe to eat for at least a year – and possibly much longer – without refrigeration. (Once opened, refrigeration is required and shelf life typically drops to a few weeks, depending on the product.)
Canning makes use of a fundamental concept: Harmful microorganisms can’t survive sustained exposure to high heat. This concept underpins pasteurization, the revolutionary food sterilization process developed by Louis Pasteur in the mid-19th century.
Interestingly, the canning process was perfected in the first two decades of the 19th century, well before Pasteur confirmed that bacteria and other microorganisms were behind food spoilage. Its genesis: A late-1700s contest, sponsored by the French government, that offered 12,000 francs (a significant sum at the time) to anyone who could come up with a safe, reliable method of preserving large quantities of food over long periods of time.
French inventor Nicolas Appert, working in concert with the French Navy, created a sanitary means of doing so – using tin cans, hence the term canning – in 1806. The French Navy made good on its promise and awarded Appert the prize money in 1809. According to BBC Magazine, the canning process was perfected and commercialized in England during the following decade. Canning factories sprouted in London and other British cities, and tinned meat became a common element of the British diet within a few decades.
What You Need to Can at Home
Home canning operations vary dramatically in size, scope, and capability. If you’re interested in canning on a large scale, perhaps to sell your items at a market or specialty store, you may need larger or additional equipment than the following. On the other hand, if you’re just canning for personal or family use, this is a fairly comprehensive list of what you need to get started.
- A sturdy stainless steel or cast iron stockpot, preferably with a capacity of two gallons or more.
- A candy thermometer that reads at least up to 250 degrees.
- Sealable canning jars (preferably with two-piece, screw-on lids).
- Tongs, preferably with heatproof handles (grill tongs work fine).
- Any safety equipment necessary for handling hot cooking implements, such as potholders and gloves.
Basic Process
Due to the tenacity of some harmful strains of bacteria, particularly those that produce botulinium toxin, home canning is a meticulous process that requires thoroughness and studious attention to detail. The exact procedure varies somewhat based on what’s being canned.
However, it usually follows this basic outline:
- Preparation. It’s somewhat rare to can fresh produce or meat without first preparing it in some fashion. That said, this is the most variable part of the canning process. For instance, pickled cucumbers simply need to be sliced and bathed in brining fluid (basically a mixture of salt and water) prior to being sealed, which can be done in a matter of minutes. By contrast, canned fish requires scaling and possibly de-boning, a potentially hours-long process. Jam and preserves demand a lengthy cooking process. Check your canning recipe for specific details. If you’re cooking your canned contents, use a candy thermometer to ensure that their temperature exceeds the boiling point to ensure initial sterilization.
- Container Sterilization. This is a critical step, as even unused canning jars plucked straight out of the packaging aren’t sterile. To sterilize, fill a large stainless steel or cast iron stockpot at least halfway with water (sufficient to cover the tops of cans by at least one inch) and heat to a full rolling boil. Use tongs to carefully add the jars, lids, and screw-on seals separately. Lids tend to stick together if left unattended, so watch carefully and be ready to separate using your tongs. Each individual item must be fully submerged in boiling water for at least five minutes. Once sterilized, place everything on a clean (preferably sterilized) wood or cloth surface.
- Filling, Cleaning, and Sealing. When the jars are cool enough to work with, carefully add contents using sterile equipment, such as a metal ladle, spoon, or funnel. Unless your recipe specifies otherwise, fill to a quarter-inch below the top of the jar. Using a paper towel dipped in an appropriate preserving agent (such as brine, vinegar, or lemon juice – this varies depending on the recipe), carefully wipe the rim of each jar to remove any food particles that could contaminate the jar or compromise the seal. To seal jars, add and center each lid, then firmly screw on each seal. To check each seal, press down on the top of each lid. If it doesn’t move, you’ve done a good job.
- Processing. This step involves heating the contents of your sealed jars to achieve full sterilization. It’s not necessary for some canned foods, such as fresh pickled vegetables. However, you must refrigerate unprocessed cans immediately after sealing to reduce the risk of contamination (check the recipe to confirm). Process using the same pot of boiling water used for sterilization, submerging each jar so that the liquid tops each lid by at least one inch. Keep two inches of space between each jar, if possible. Once the pot is full, cover and boil for at least 10 minutes. Watch to make sure there’s no water spillover, which can quickly get messy and may interfere with the operation of a gas stove. Repeat as many times as necessary to process all jars. After each batch, remove carefully with tongs and return to a clean wood or cloth surface to cool.
- Seal Check. After the jars have cooled and rested for a day, repeat the seal-checking procedure by pressing down on the top of each lid. If any jars aren’t fully sealed, discard them. This is critical, as the contents of unsealed jars are vulnerable to spoilage.
- Storage. The whole point of canning is to negate the need for specialized storage arrangements, such as freezing or refrigeration. That said, certain storage practices can lengthen your cans’ shelf lives while preserving the taste and nutritional value of their contents. For best results, store your sealed cans in a dry, cool environment away from direct sunlight or heat sources. Above-ground pantries and kitchen shelves are ideal. If possible, avoid damp basements. And remember that there’s no need to refrigerate unopened cans that have undergone processing.
Safety and Other Considerations
Done properly, home canning is a satisfying, productive experience. However, it does come with some risks and special considerations:
- Risk of Scalding. Canning at home involves handling hot metal implements and working in close proximity to open pots of boiling water (and, if you use a gas stove, open flames). Wear appropriate protective gear, such as potholders and possibly even goggles, and take appropriate safety precautions when handling hot pots, jars, and boiling water.
- Risk of Damage or Loss During Transfer. The typical canning process involves delicate transfer operations that, if not properly executed, can result in damage, loss, or personal injury. Sterilization and processing both require you to use tongs to add and remove jars and lids from boiling water, which can be difficult when these items are wet or smooth. Adding contents to jars can be messy and presents a high risk of loss without proper equipment or care.
- Risk of Illness. Canning has a major long-term risk: food poisoning. Paralysis-inducing botulism is a particular worry, since the bacteria that produce botulinium toxin (the neurotoxin that causes botulism) can survive at temperatures high enough to kill most other bacteria species (though even botulinium-producing bacteria succumb after several minutes of exposure to boiling water). With properly sterilized and processed cans, this risk is minimal to nonexistent. When sterilization and processing is incomplete, or when processing isn’t required or desirable, the growth of harmful microorganisms becomes far more likely – and, after a certain point, all but inevitable. Definitely refrigerate unprocessed cans immediately and throw out any unused portion after a month has passed. For processed cans, follow sterilization and processing instructions to the letter and always err on the side of longer boiling times.
- Restrictions on Sales of Home-Canned Items. If you have the right equipment and an ample cooking space, scaling your canning operation is a realistic prospect. Unfortunately, you’re unlikely to be able to commercialize your operation without submitting to state licensing and inspection requirements for commercial kitchens. Some jurisdictions may have limited exceptions for small-scale operations, such as those run for the express purpose of selling canned goods at farmers markets, but it’s critical to check with the appropriate authorities before making any assumptions or attempting to sell home-canned goods. Otherwise, you could face hefty fines.
Advantages of Canning vs. Buying Canned at the Store
1. Canning Is Fun
Canning at home is far more difficult and time-consuming than pushing a few buttons online or driving to the store. For me, the most persuasive argument in favor of home canning is also the simplest: it’s fun.
Canning changes a run-of-the-mill ingredient or ingredients into a long-lived, stable form that you can enjoy at your leisure – and the process of creating that form is immensely satisfying. I challenge you to have as much fun on your next trip to the grocery store as you will at your first home canning session.
2. Control and Knowledge of Ingredients Used
Another powerful argument for canning is that it allows you to exercise far greater control over what you put in your body than buying canned items at the store. If you’re using store-bought ingredients, you’re free to spend a few dollars more for high-quality, organic, sustainably raised items that have more nutritional content and less environmental impact. If you’re using homegrown ingredients, you know exactly where your food is coming from and can personally vouch for its quality.
And high-quality ingredients aren’t just better for you and the environment – they often taste better too.
3. Educational for Kids (and Adults)
For several reasons, canning is an educational experience for people of all ages. By nature, canning defies biology. To do it properly, you have to have at least a rudimentary knowledge of how it prevents spoilage and facilitates long-term preservation. This is a great way to teach kids – and inexperienced adults – basic lessons about food safety.
Canning is also a great way to teach or learn basic cooking and food preparation techniques in general. I’d personally never made jam from scratch before I attempted my strawberry rhubarb recipe, and the sight of the sugar, rhubarb, and strawberries dissolving into a hot, viscous, bubbling mess at full boil is one I won’t soon forget.
Finally, canning can be an important component of a broader curriculum on low-impact food systems. You can prepare and can dozens (probably hundreds) of domestic and wild food items that either already grow or can easily be grown in your home garden or the natural areas around your house. If you can’t grow food year-round in your area, learning how to safely preserve what you grow is critical to a sustainable lifestyle.
4. No Need to Buy New Jars Every Time
Even if you’re willing to spend a bit extra to buy high-quality ingredients, you can likely keep your total home canning costs under the amount you’d spend for an equivalent quantity of the store-bought variety. How? By eliminating what’s likely to be the single biggest recurring expense for your home canning operation: store-bought jars.
You don’t have to blow your own glass jars to make this work – you just have to reuse empty canning jars. Since modern canning jars, lids, and screws are highly durable, they can survive an indefinite number of cleaning, sterilization, and processing cycles. Though the proportionate cost-cutting potential of reusing jars varies depending on how expensive the recipe’s other ingredients are, it’s always significant.
What Can You Can? Suggestions for Novice Canners
If you’re intrigued by the idea of canning your own food, I won’t blame you for experimenting on your own. After all, jam and preserves aren’t the only things worth canning. In fact, when you follow the basic steps outlined above and any preparation requirements specific to your chosen recipe, it’s possible to can pretty much anything that grows.
Animal protein is a bit trickier, but there are many possibilities there too. The first commercial canning operations, in early-1800s England, focused on meat – and actually helped make meat more widely available to lower- and middle-class people who previously couldn’t afford to eat it regularly or in large quantities due to supply and storage constraints.
What to Grow, Pick, and Include in Your Next Canning Recipe
Affordable, easy-to-grow (or harvest in the wild) raw ingredients for a home canning operation include the following, with recipe suggestions:
- Raspberries, Blackberries, and Blueberries. Great for jams, preserves, and pie filling.
- Pumpkin and Squash. Great for pie filling, holiday sides (such as mashed butternut squash), and as chunks that can be used as ingredients in future dishes.
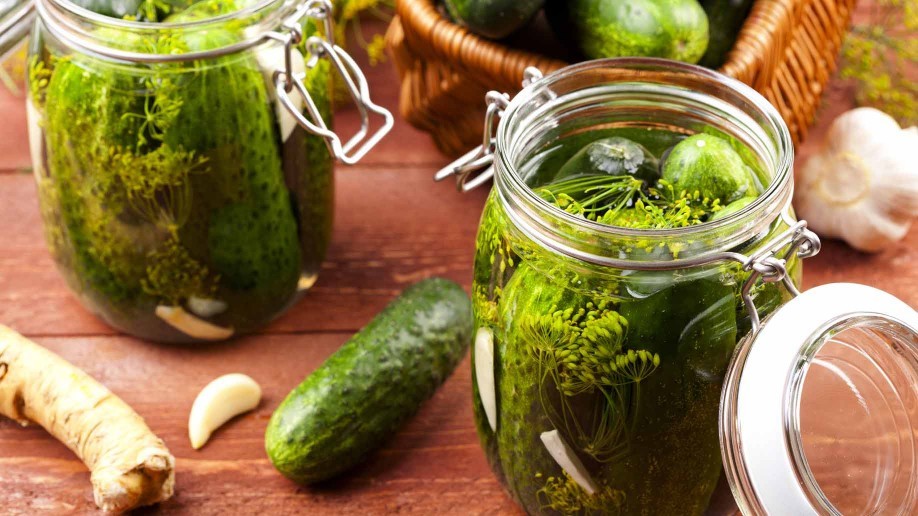
- Cucumbers. Great for dill pickles, relish, and as a component in salsa.
- Apples and Pears. Great as pie filling, jams, spreads, and candied desserts or sides.
- Black, Pinto, Kidney, or Lima Beans. Great as a base for bean salad (pickled or non-pickled).
- Green Beans and Peas in the Pod. Great for preserving whole beans and pea pods for use as sides in future dishes, or as a base for bean salad.
- Carrots, Turnips, and Other Root Vegetables. Also great for preserving for future use, usually sliced due to the veggies’ bulkiness. Carrots work well as candied sides or desserts too.
- Cauliflower and Broccoli. Great as a preserved ingredient in bean salad or other holiday sides, or as a component in a complex pickle dish.
- Tomatoes. Great as a base for tomato sauce, pizza sauce, or salsa.
- Sweet or Spicy Peppers. Great as a salsa component, complex pickle dish component, or bean salad component.

Leave A Comment